JZ018 How do I create interim statements using the Jazzit 9 column financial statements?
The Jazzit 9 column financial statement supports a variety of column configurations. This is useful for preparing interim statements. In this article we will show an example of interim financial statements created using the Jazzit 9 column financial statements.
Initial setup
Before getting started we need to ensure that:
-
The Jazzit financial statements are set to show 9 columns with totals format.
 Please refer to: 1-9 Column Implementation for more information on implementing the 9 column financial statement.
 -
Set the Caseware engagement properties to support the period lengths that are to be reported in the interim statements.

Manual Entry of period data
If you are manually entering data, check your Period Balances tab and select your preferred method of entry (Working Trial Balance or Other Entries). You will only be able to enter using one method or the other, not both.
Entering via the Working Trial Balance
Select the first radio button if you wish to enter via the Working Trial Balance.
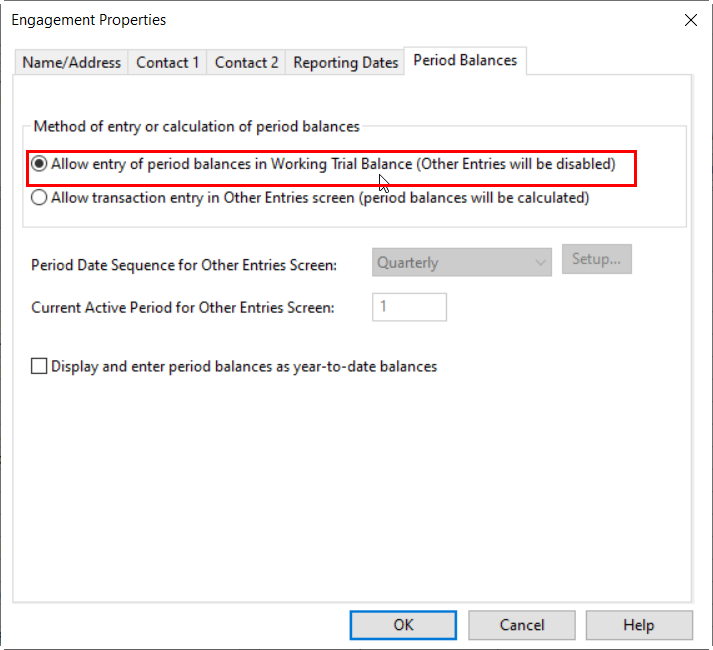
Double-click on the transactions column in the Working Trial Balance to access the period columns where you can manually enter amounts.

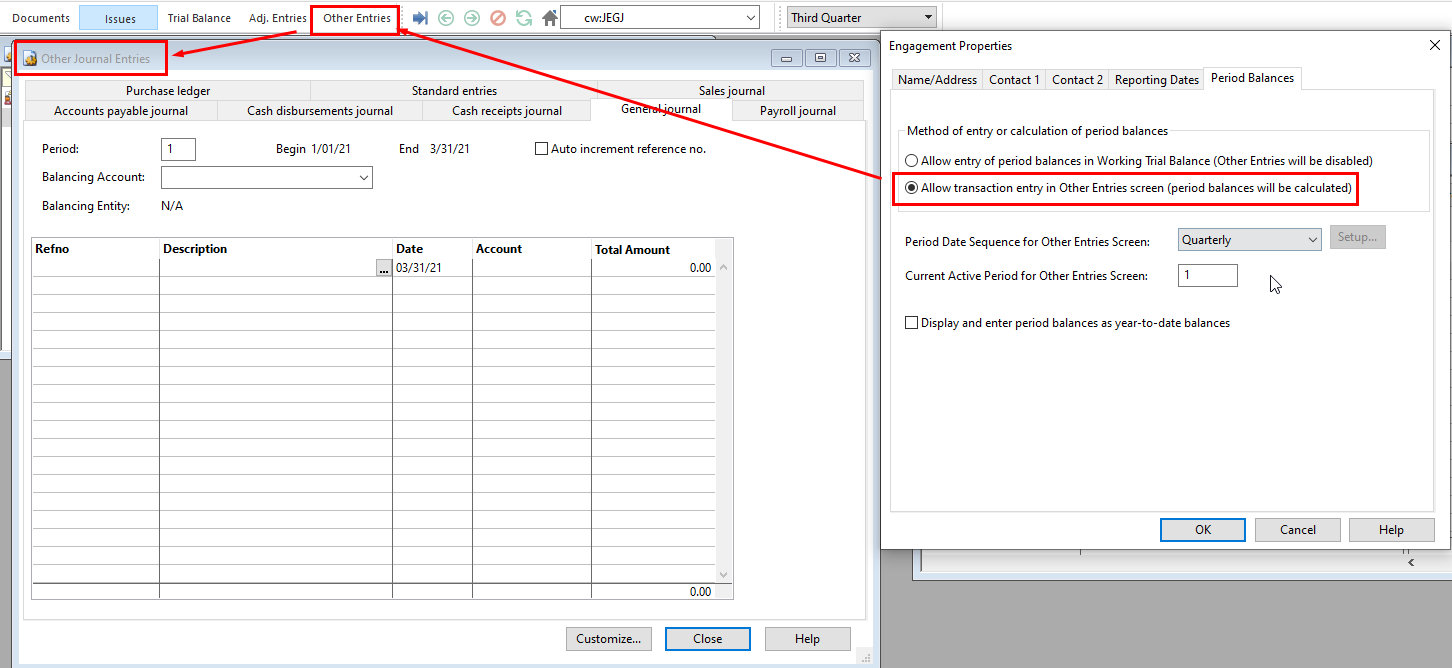
Entering via Other Entries
If you prefer to enter via Other Entries select the 2nd radio button.
|
|
Please keep in mind that data entered via the Working Trial balance cannot be combined with data entered via Other Entries. Select your data entry method before you start entering data!
|
Example
In this example we will create an interim statement with 3 columns. The year-end for the example is September 30, 2013. The example will cover the 3rd quarter (ending June 30, 2013).
-
Column 1: Displays the transactions for the 3rd quarter of the year.
-
Column 2: Displays the 3rd quarter year-to-date.
-
Column 3: Displays the 3rd quarter prior year-to-date
|
|
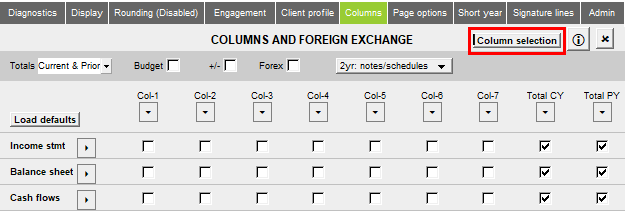
Unable to see all column controls?
The Column settings panel does not make all controls visible by default. Click on the button entitled Column selection/Period settings to make the other parts of the control panel visible.
 |
-
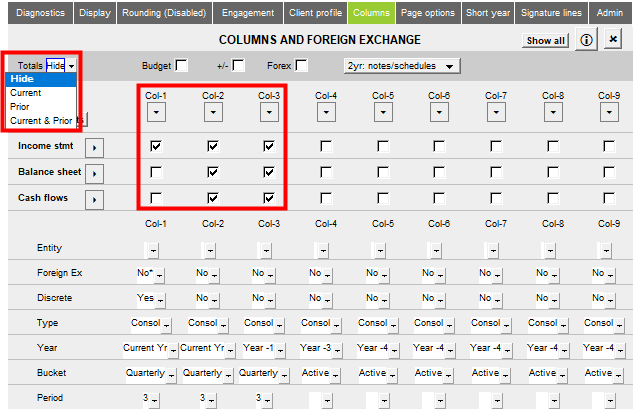
In the Jazzit 9 column financial statement, click on the Columns tab located in the Home Menu. This will display the column settings for the 9 column financial statements.
-
By default, the 9 column statements will have 2 total columns enabled. Deactivate the total columns by clicking on Hide in the Show/hide total cols: dropdown.
-
Activate columns 1-3 by clicking on the appropriate checkboxes. You can also activate a column for all 3 statements (BS, IS and CF) at once by clicking on the S button.
-
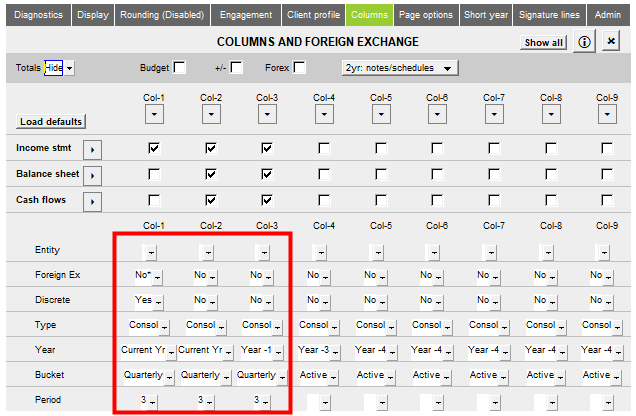
Set the individual columns using the following settings.
-
Column 1 (Col-1):
-
Year = Current yr (Refers to the period ending on Sept 2013)
-
Bucket = Quarterly (uses the quarterly periods as set in the Engagement Properties)
-
Period = 3 (Refers to the 3rd quarter)
-
Discrete = Yes (Include only amounts in the 3rd quarter)
-
-
Column 2 (Col-2):
-
Year = Current yr (Refers to the period ending on Sept 2013)
-
Bucket = Quarterly (uses the quarterly periods as set in the Engagement Properties)
-
Period = 3 (Refers to the 3rd quarter)
-
Discrete = No (Include Year-to-date amounts)
-
-
Column 3 (Col-3):
-
Year = 1st prior yr (Refers to the period ending Sept 2012)
-
Bucket = Quarterly (uses the quarterly periods as set in the Engagement Properties)
-
Period = 3 (Refers to the 3rd quarter)
-
Discrete = No (Include Year-to-date amounts)
 If Current yr is the only option available for Year check to see that the total columns have been disabled. Current year is the only available option when total columns are enabled.
 -
-
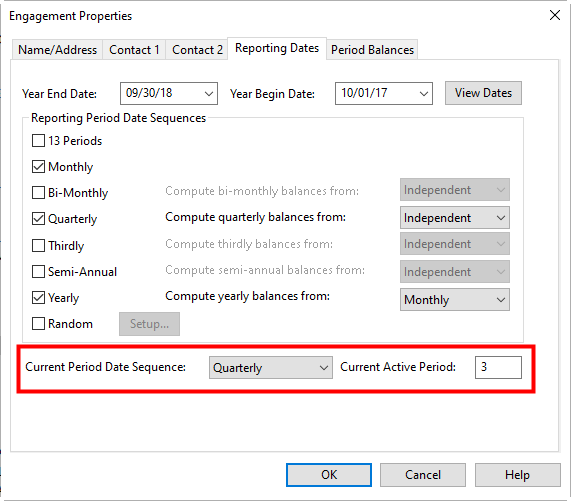
We will need to ensure that the headings in the Jazzit financial statements display the correct period end date for the 3rd quarter (June 30 2013). Perform the following steps:
-
In Caseware, click Engagement > Engagement Properties set your Current Period Date Sequence to Quarterly and the Current Active Period to 3.
-
Click on the
 button to continue.
 -
In the Jazzit financial statements click on the Page options tab in the Home menu and select period for the Current heading dropdown. This will ensure that the headings say period ended instead of year ended.

-
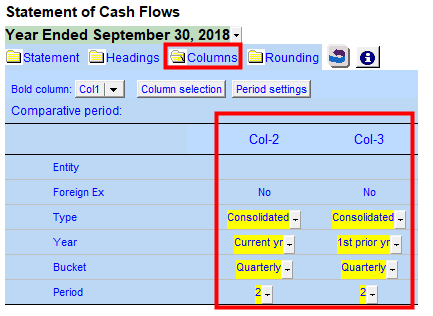
At the top of the Balance Sheet, Income Statement and Cash Flows click on the folder icon (
 ) beside Columns This will reveal various options for the column headings. Click on the checkbox next to the items you want to see printed. Any text that is blue will not print.
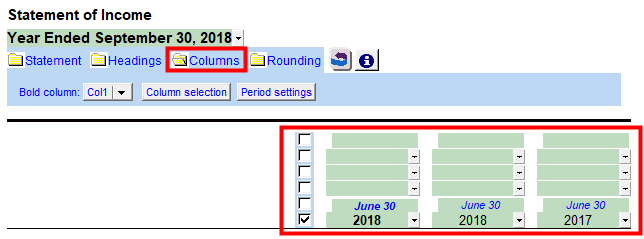
-
If you are using the Cash Flow statement, ensure that the appropriate comparative period is set for each column.