HELP GUIDE
×
Menu
Quick Guides
Template Specific Options
 
Template Specific Options
1
Show groups
1. Show groups
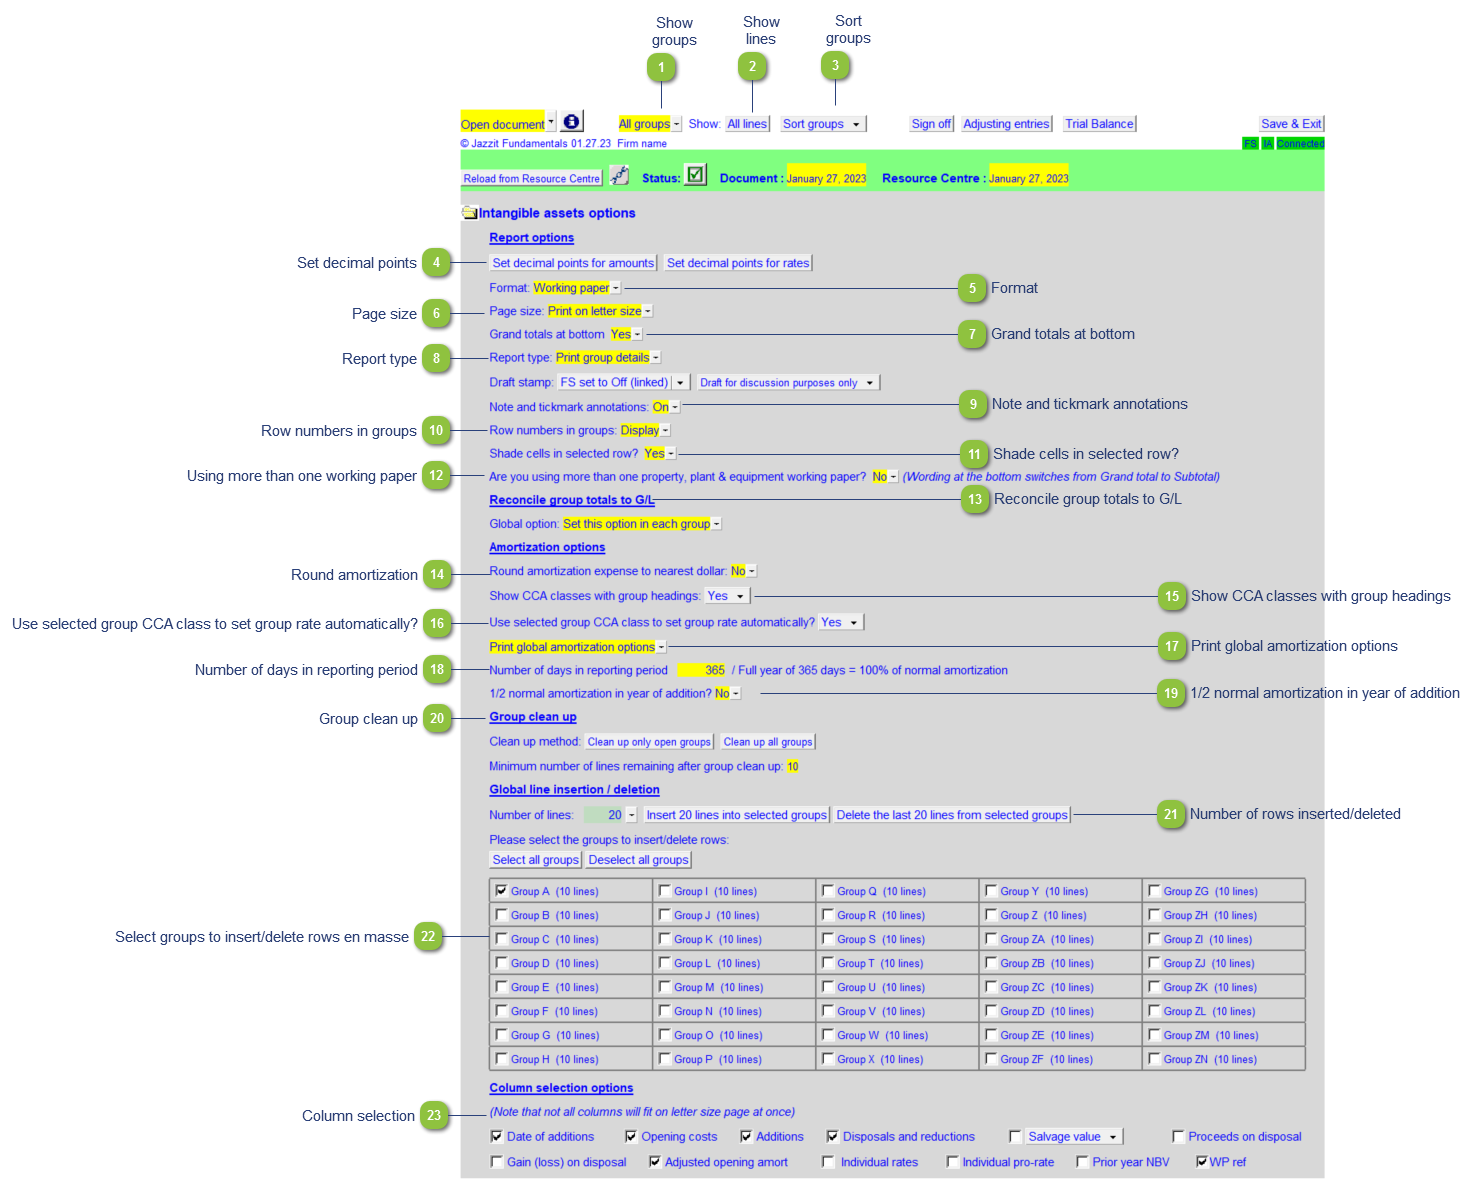
Use the popup menu to select to show all groups (including empty groups) or printing (filled in) groups only. Setting to printing groups only is useful when reviewing the working paper.
2
Show lines
2. Show lines
Use the button to select to show all lines or printing lines only. Setting to printing lines only is useful when reviewing the working paper.
3
Sort groups
3. Sort groups
Click on the Sort button to sort the groups into the desired order. Groups can be sorted both manually and alphabetically.
4
Set decimal points
4. Set decimal points
Set the decimals for the amounts and rates.
5
Format
5. Format
Choose to print the working paper as either a standard working paper, or client version. Print a client version will remove the sign-off block and document number, and also move the page numbers to the bottom right
6
Page size
6. Page size
Choose between letter and legal size paper.
7
Grand totals at bottom
7. Grand totals at bottom
Toggle grand total for schedule on or off.
8
Report type
8. Report type
Print group details or group summary.
9
Note and tickmark annotations
9. Note and tickmark annotations
Show or hide the note and annotations column.
10
Row numbers in groups
10. Row numbers in groups
Display, print or hide the row numbers in the groups.
11
Shade cells in selected row?
11. Shade cells in selected row?
When this option is enabled, the selected row will be highlighted with a different color.
12
Using more than one working paper
12. Using more than one working paper
If you require more than 40 asset classes, there is a second working paper available to use.
13
Reconcile group totals to G/L
13. Reconcile group totals to G/L
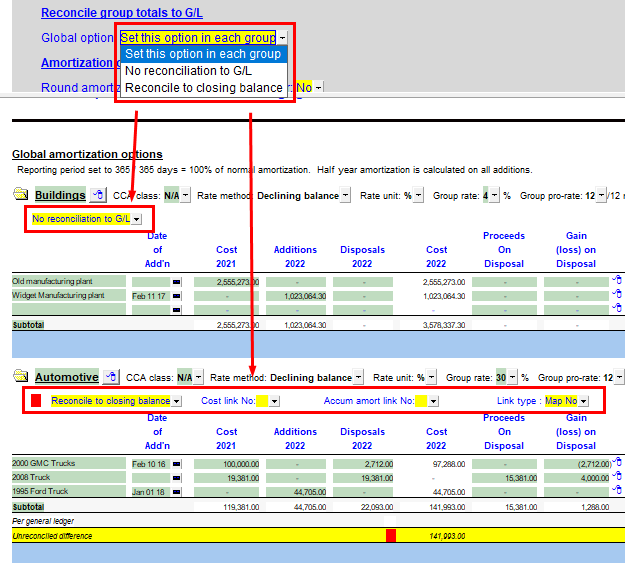
An option to set the diagnostic to reconcile group subtotals to a specific amount in the Caseware trial balance is available for each group. See Working Paper Highlights for more information.
 
This option can be globally disabled in the WP - No Reconciliation to GL
Make the setting on a per group basis - Set this option in each group
Enable this setting globally for every group - Reconcile to closing balance
 
14
Round amortization
14. Round amortization
Round amortization expense to the nearest dollar.
15
Show CCA classes with group headings
15. Show CCA classes with group headings
Use the popup button to select to show or skip the CCA classes for each group heading.
16
Use selected group CCA class to set group rate automatically?
16. Use selected group CCA class to set group rate automatically?
Use selected group CCA class to set group rate automatically.
17
Print global amortization options
17. Print global amortization options
Print/skip global amortization options.
 
18
Number of days in reporting period
18. Number of days in reporting period
Indicate the number of days within the reporting period.
19
1/2 normal amortization in year of addition
19. 1/2 normal amortization in year of addition
Indicate whether ½ year amortization is calculated on all additions.
20
Group clean up
20. Group clean up
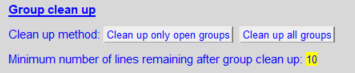
Removes empty lines from amortization groups to 'clean up' their appearance. Empty lines will be left in a group if it is needed to maintain the minimum number of lines in a group as set in the yellow cell. The minimum can be set down to 1 line.
 
Clean up can be applied only to groups currently open/visible or applied to all groups in the working paper.
21
Number of rows inserted/deleted
21. Number of rows inserted/deleted
Select the number of rows that you want to insert into selected groups or delete from selected groups.
22
Select groups to insert/delete rows en masse
22. Select groups to insert/delete rows en masse
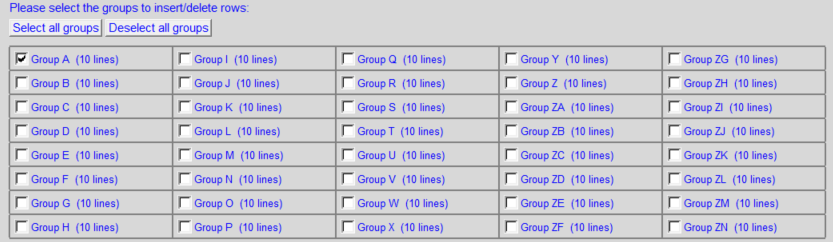
Select the groups that you want to insert rows into or delete rows from. The amount of rows already added to each group is indicated in brackets.
 
 
Updating the working paper from the Resource Centre will result in the inserted lines to be deleted. To prevent this from happening, we recommend that the Jazzit Administrator also increase the number in rows for each group in the Resource Centre module with the help of this function.
23
Column selection
23. Column selection
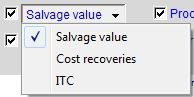
The columns selection options allow you to choose which columns you want to print on the working paper. The column indicating Salvage value can also be changed to show Salvage value, Cost recoveries or ITC.